I have 2 Raspberry Pi 4 in my home as below.
1. Nextcloud server
2. WordPress server, samba server, virus scan server
This time I decided to install Arch Linux onto them.
– I like Arch Linux OS.
– My laptop is installed Endeavour OS which is one of Arch Linux flavor.
In previous article I couldn’t install but solved.
This is note how to successfully install.

- Installing Arch Linux 64bit
- Updating firmware by rpi-update
- Boot
- Timezone configuration
- IP address configuration
- Host name configuration
- Changing root user password
- Creating new user for daily operation
- Configuring SSH to use public key based authentication
- Cofiguring locale
- Installing argononed
- Installing docker/docker-compose
- Installing vpnclient
- Conclusion
Installing Arch Linux 64bit
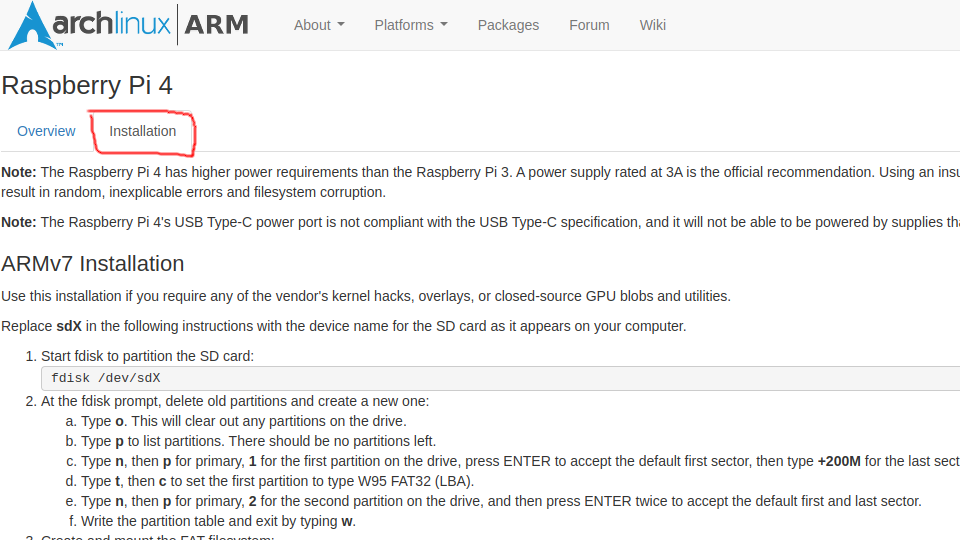
First please install Arch Linux 64bit onto Raspberry Pi 4 by following this page.
You can do by seeing this section.
In my case some lines on /etc/fstab is needed.
Unless doing this microSD is mounted Read-Only.
$ sudo vi /etc/fstab
# Static information about the filesystems.
# See fstab(5) for details.

# <file system> <dir> <type> <options> <dump> <pass>
/dev/mmcblk0p1  /boot   vfat    defaults        0       0
/dev/mmcblk0p2  /   ext4    defaults        0       0 # <- 追記
Updating firmware by rpi-update
Next is to update firmware by rpi-update as mentioned on this video.

This is what I did.
Please note you need to run rpi-update on Raspberry Pi.
$ git clone https://github.com/Hexxeh/rpi-update
$ cd rpi-update
$ sudo BOOT_PATH=$HOME/boot ROOT_PATH=$HOME/root ./rpi-update
 *** Raspberry Pi firmware updater by Hexxeh, enhanced by AndrewS and Dom
 *** Performing self-update
 *** Relaunching after update
 *** Raspberry Pi firmware updater by Hexxeh, enhanced by AndrewS and Dom
FW_REV:ecb31dc9a698ff9d17d9a5a24550ea5b9aaea7eb
 *** We're running for the first time
 *** Backing up files (this will take a few minutes)
 *** Remove old firmware backup
 *** Backing up firmware
 *** Backing up modules 6.1.21-v8+
WANT_32BIT:0 WANT_64BIT:1 WANT_PI4:1
#############################################################
WARNING: This update bumps to rpi-6.1.y linux tree
See: https://forums.raspberrypi.com/viewtopic.php?t=344246
'rpi-update' should only be used if there is a specific
reason to do so - for example, a request by a Raspberry Pi
engineer or if you want to help the testing effort
and are comfortable with restoring if there are regressions.
DO NOT use 'rpi-update' as part of a regular update process.
##############################################################
Would you like to proceed? (y/N)
 *** Downloading specific firmware revision (this will take a few minutes)
  % Total    % Received % Xferd  Average Speed   Time    Time     Time  Current
                                 Dload  Upload   Total   Spent    Left  Speed
  0     0    0     0    0     0      0      0 --:--:-- --:--:-- --:--:--     0
100  116M    0  116M    0     0   9.9M      0 --:--:--  0:00:11 --:--:-- 10.9M
 *** Updating firmware
 *** Updating kernel modules
 *** depmod 6.1.25-v8+
 *** Updating VideoCore libraries
 *** Using SoftFP libraries
 *** Updating SDK
 *** Running ldconfig
 *** Storing current firmware revision
 *** Deleting downloaded files
 *** Syncing changes to disk
 *** If no errors appeared, your firmware was successfully updated to ecb31dc9a698ff9d17d9a5a24550ea5b9aaea7e
Boot
Connect microSD to Raspberry Pi and turn on.
You can log in by either of them.
| # | A | B |
| User name | alarm | root |
| Password | alarm | root |
First of all pacman to be up to date.
$ sudo pacman-key --init
$ sudo pacman-key --populate archlinuxarm
$ sudo pacman -Suy
Now you got vanilla Arch Linux!
Installed vim because vi is too simplified…
$ sudo pacman -S vim
I installed yay too.
$ sudo pacman -S base-devel git go
$ git clone https://aur.archlinux.org/yay.git
$ cd yay
$ makepkg -si

# Clean up
$ cd ..
$ rm -rf yay
Timezone configuration
I live in Yokohama so I configured timezone as Asia/Tokyo.
$ sudo timedatectl set-timezone Asia/Tokyo
IP address configuration
We can find ethernet device name is end0.
$ ip a show
(omit)
2: end0: <BROADCAST,MULTICAST,UP,LOWER_UP> mtu 1500 qdisc mq state UP group default qlen 1000
    link/ether 12:34:56:78:90:ab brd ff:ff:ff:ff:ff:ff
    inet 192.168.1.94/24 brd 192.168.1.255 scope global end0
       valid_lft forever preferred_lft forever
(omit)
Then I created configuration file for end0.
$ sudo vim /etc/systemd/network/end0.network
[Match]
Name=end0

[Network]
Address=192.168.1.23/24
Gateway=192.168.1.1
DNS=192.168.1.1

# Deleting existing file which affects end0
$ sudo rm /etc/systemd/network/en*.network

# Reboot to reflect change.
$ sudo reboot
Host name configuration
I configured host name because default host name is alarm.
$ sudo vim /etc/hostname
nextcloud-server

# Reboot to reflect change.
$ sudo reboot
Changing root user password
I changed root user password because default password is root which is easily predictable!
$ sudo -s
passwd
New password: (Input password)
Retype new password: (Input password)
passwd: password updated successfully
Creating new user for daily operation
I created new user yasu for daily operation and added to /etc/sudoers.
$ sudo useradd yasu

$ sudo passwd yasu
New password: (Input password)
Retype new password: (Input password)
passwd: password updated successfully

$ id
uid=1000(alarm) gid=1000(alarm) groups=1000(alarm),998(wheel)
$ id yasu
uid=1001(yasu) gid=1001(yasu) groups=1001(yasu)

$ visudo
(omit)
yasu ALL=(ALL:ALL) ALL # Add to tail
I deleted user alarm because I don’t use.
$ sudo userdel -r alarm
$ ls /home/
yasu
$ id alarm
id: 'alarm': no such user
If you face error during userdel then this article may have solution.
Configuring SSH to use public key based authentication
I configured to use public/private key for SSH authentication by referring this article.

Cofiguring locale
If you want to add your locale please update /etc/locale.gen.
$ sudo /etc/locale.gen
(omit)
# en_JS.UTF-8 # <- Remove # to activate
(omit)

# Generating locale
$ sudo locale-gen

# Configuration of start up
$ sudo vim /etc/locale.conf
LANG=en_US.UTF-8
Installing argononed
I use this chassis so I need to install argononed to be able to control cooling fan.
You need to manually install onto Arch Linux.
– Link to repository
$ sudo pacman -S i2c-tools lm_sensors python
$ mkdir argonone
$ cd argonone
$ curl -o PKGBUILD https://raw.githubusercontent.com/Elrondo46/argonone/master/PKGBUILD
$ curl -o argonone.install https://raw.githubusercontent.com/Elrondo46/argonone/master/argonone.install
$ makepkg --install

$ sudo systemctl daemon-reload
$ sudo systemctl enable argononed
At this time I need to modify small thing to properly run.
– bus.write_byte() after try
$ sudo vim /opt/argonone/bin/argononed.py
(omit)
def temp_check():
    fanconfig = ["65=100", "60=55", "55=10"]
    tmpconfig = load_config("/etc/argononed.conf")
    if len(tmpconfig) > 0:
        fanconfig = tmpconfig
    address = 0x1a
    prevblock = 0
    while True:
        temp = os.popen("cat /sys/class/thermal/thermal_zone0/temp").readline()
        val = float(temp) / 1000
        block = get_fanspeed(val, fanconfig)
        if block < prevblock:
            time.sleep(30)
        prevblock = block
        try:
            bus.write_byte(address,block) # From bus.write_byte_data(address,0,block)
        except IOError:
            temp = ""
        time.sleep(30)
(omit)
I configured and observed if it runs as expected or not.
$ sudo argonone-config
--------------------------------------
Argon One Fan Speed Configuration Tool
--------------------------------------
WARNING: This will remove existing configuration.
Press Y to continue:Y
Thank you.

Select fan mode:
  1. Always on
  2. Adjust to temperatures (55C, 60C, and 65C)
  3. Customize behavior
  4. Cancel
NOTE: You can also edit /etc/argononed.conf directly
Enter Number (1-4):2

Please provide fan speeds for the following temperatures:
55C (0-100 only):10
60C (0-100 only):50
65C (0-100 only):100
Configuration updated.

# Clean up
$ cd ..
$ rm -rf argonone
Installing docker/docker-compose
I use docker/docker-compose for Nextcloud server so installed them.
$ sudo pacman -S docker docker-compose
If you are interested in running Nextcloud on docker, this article is helpful.

Installing vpnclient
I use SoftEther for VPN between LightSail on AWS and my home so installed vpnclient referring this article.

After installing I changed from password based authentication to public/private key based authentication.

I configured to automatically run vpnclient when it turns on.

That’s about it for initial setup.
After that you can configure as you like.
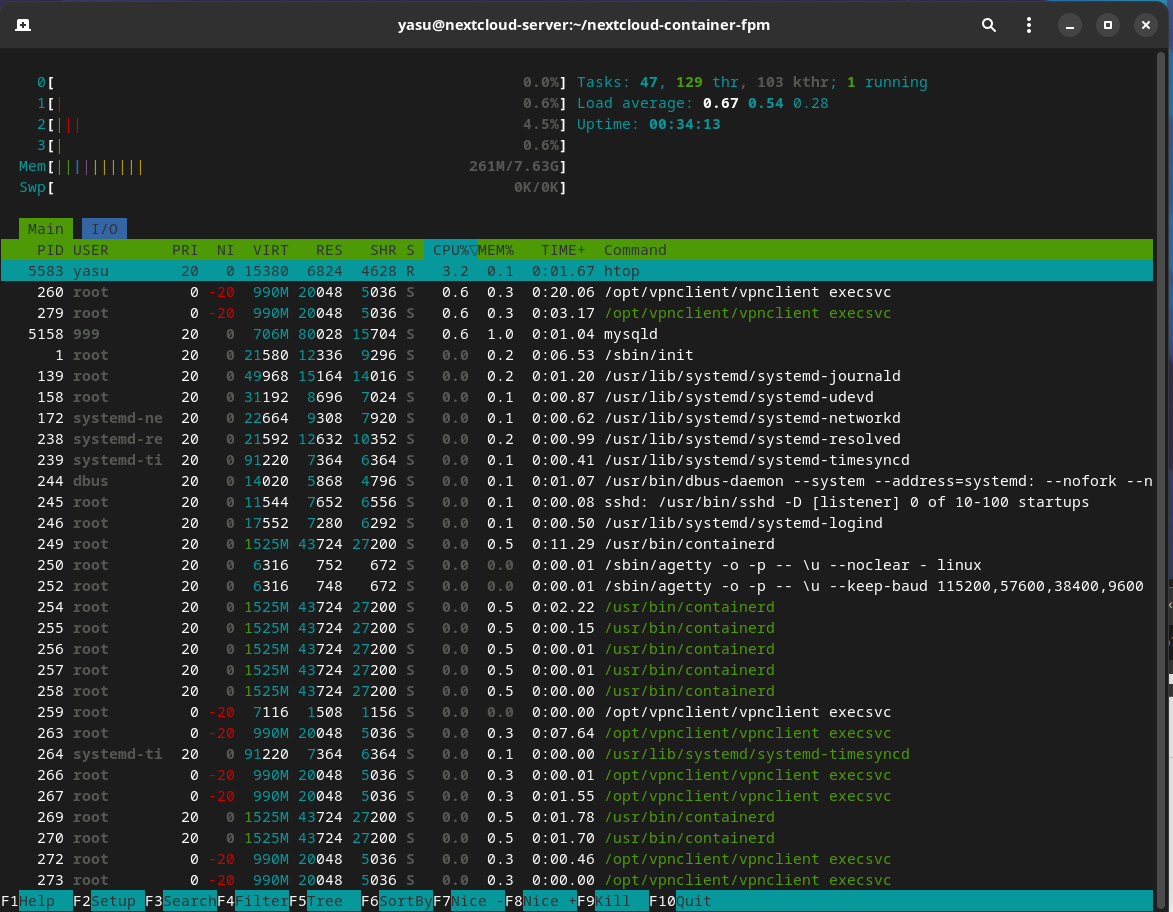
This is screenshot of htop of mine.
It shows memory consumption is 265MB which is very lightweight!
Conclusion
How was it?
If you are already Arch Linux then you will easily setup!

Comments