I am running Nextcloud on my Raspberry Pi.
I buy static IP address from internet service provider(=ISP) for 10 USD per month.
I want to reduce cost of this.
As a conclusion I could resolve by using LightSail and Softether.
– 3.5 USD per month
And there will be no limitation for selecting ISP.
– In Japan only some ISP will provide static IP address option.
Let me summarize how to do it.
System architecture
This is before.
I assign static IP address which is provided from ISP.
Reverse proxy receives all request from outside and pass through based on domain name.
This is not storange, is it?

This is after.
I used the benefit that we can get static IP address from LightSail for free.
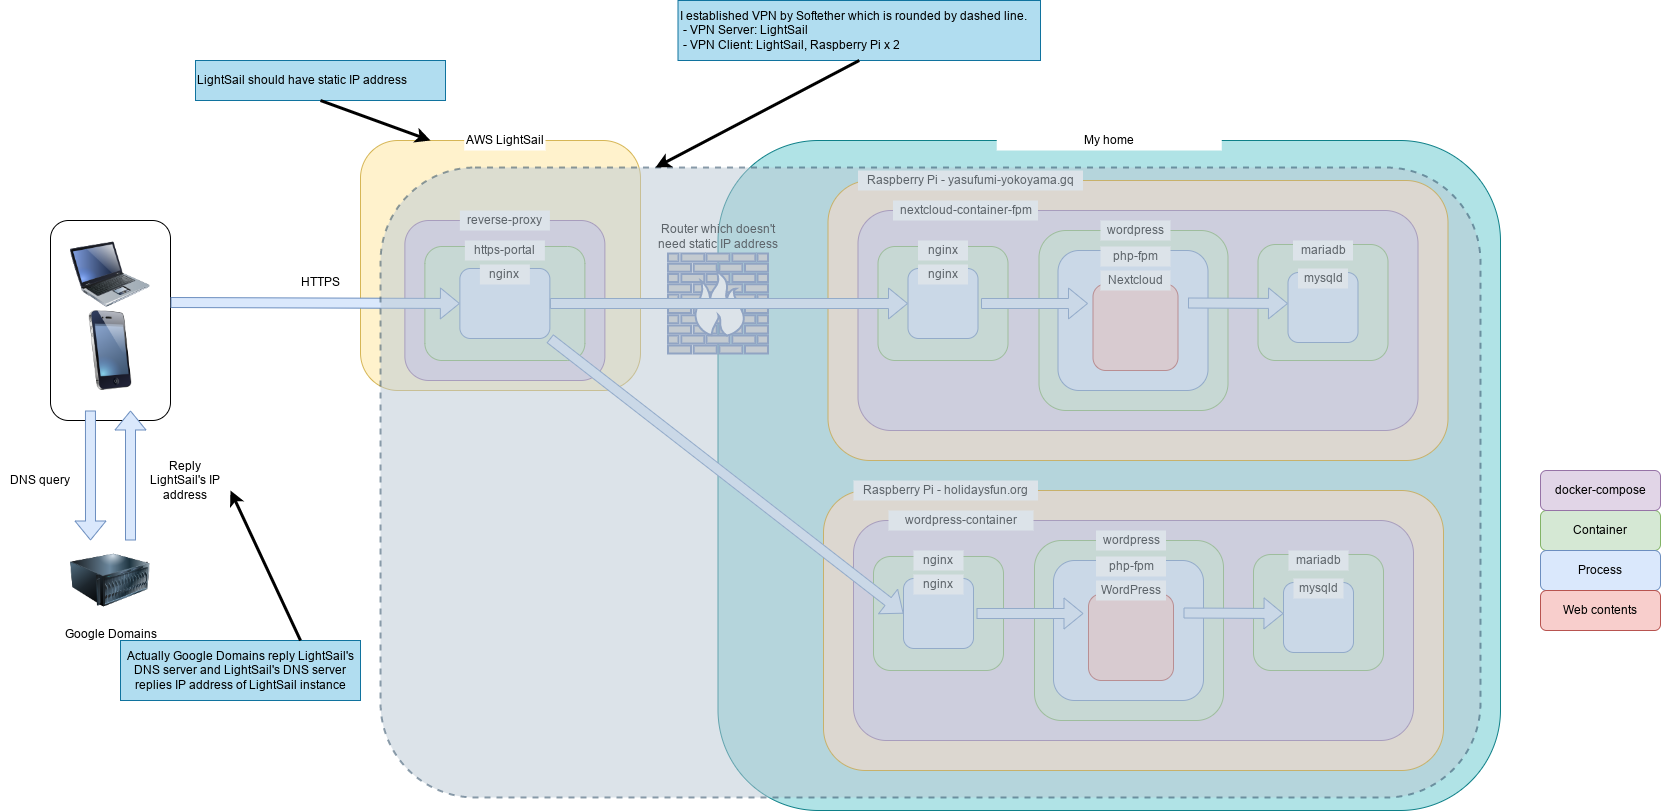
With this structure,
We select any ISP which doesn't have static IP address option.
Actually we need to pay 3.5USD per month to run LightSail instance.
And it will be pay per use if communication data size exceeds 1TB in month.
But I think we will not exceed 1TB for personal use like me.
Setup
VPN Server
First you create instance of LightSail.
Please refer this article how to create.
I created 5USD instance because I want to run Collabora, but if you don’t want then 3.5USD is enough.

next is to download Softether source code.
You can download the latest package which has “rtm”.
I downloaded softether-vpnserver-v4.38-9760-rtm-2021.08.17-linux-x64-64bit.tar.gz.
make and install.
sudo yum install gcc
wget https://github.com/SoftEtherVPN/SoftEtherVPN_Stable/releases/download/v4.38-9760-rtm/softether-vpnserver-v4.38-9760-rtm-2021.08.17-linux-x64-64bit.tar.gz
tar zxf softether-vpnserver-v4.38-9760-rtm-2021.08.17-linux-x64-64bit.tar.gz
cd vpnserver
make
cd ..
sudo mv vpnserver /opt/
sudo chown -R root:root /opt/vpnserver/
Registering as server to be able to start automatically.
sudo vim /etc/systemd/system/vpnserver.service

# Below is contents of vpnserver.service
[Unit]
Description=SoftEther VPN Server Service
After=network.target

[Service]
Type=forking
User=root
ExecStartPre=/sbin/ip link set dev eth0 promisc on
ExecStart=/opt/vpnserver/vpnserver start
ExecStop=/opt/vpnserver/vpnserver stop
Restart=on-abort
WorkingDirectory=/opt/vpnserver/

[Install]
WantedBy=multi-user.target
# Above is contents of vpnserver.service

sudo systemctl daemon-reload
sudo systemctl enable vpnserver
sudo systemctl start vpnserver
This is management tool of VPN Server.
sudo /opt/vpnserver/vpncmd
(snip)
1. Management of VPN Server or VPN Bridge
2. Management of VPN Client
3. Use of VPN Tools (certificate creation and Network Traffic Speed Test Tool)

Select 1, 2 or 3: 1 (Enter)
(snip)
Hostname of IP Address of Destination: localhost:5555 (Enter)
(snip)
Specify Virtual Hub Name: (Enter)
I created virtual hub as “virtual_hub” and created user “yasu”.
In this post I set up password based authentication.
– In next post I will switch to certificate based authentication.
VPN Server>HubCreate virtual_hub
Password: *********
Confirm input: *********
(snip)
VPN Server>Hub virtual_hub
(snip)
VPN Server/virtual_hub>UserCreate yasu /GROUP:none /REALNAME:none /NOTE:none
(snip)
VPN Server/virtual_hub>UserPasswordSet yasu
Password: ***********
Confirm input: ***********
(snip)
VPN Server/virtual_hub>IPsecEnable /L2TP:yes /L2TPRAW:no /ETHERIP:no /DEFAULTHUB:virtual_hub
IPsecEnable command - Enable or Disable IPsec VPN Server Function
Pre Shared Key for IPsec (Recommended: 9 letters at maximum): **********
I created user “fumi” as well.
I reduced listen ports and configured password for server admin.
VPN Server>ListenerList
-----------+---------
TCP 443    |Listening
TCP 992    |Listening
TCP 1194   |Listening
TCP 5555   |Listening

VPN Server>ListenerDelete 443
VPN Server>ListenerDelete 992
VPN Server>ListenerDelete 1194

VPN Server>ServerPasswordSet
Password: **********
Confirm input: **********
VPN Client
You can download, build, and install as well as VPN Server.
wget https://github.com/SoftEtherVPN/SoftEtherVPN_Stable/releases/download/v4.38-9760-rtm/softether-vpnclient-v4.38-9760-rtm-2021.08.17-linux-x64-64bit.tar.gz
tar zxf softether-vpnclient-v4.38-9760-rtm-2021.08.17-linux-x64-64bit.tar.gz
cd vpnclient
make
cd ..
sudo mv vpnclient /opt/
sudo chown -R root:root /opt/vpnclient/
Registering service as well.
sudo vim /etc/systemd/system/vpnclient.service

# Below is contents of vpnclient.service
[Unit]
Description=SoftEther VPN Client
After=network.target

[Service]
ExecStart=/opt/vpnclient/vpnclient start
ExecStop=/opt/vpnclient/vpnclient stop
Type=forking
Restart=always

[Install]
WantedBy=graphical.target
# Above is contents of vpnclient.service

sudo systemctl daemon-reload
sudo systemctl enable vpnclient
sudo systemctl start vpnclient
Configuring to connect as “yasu”.
– Creating virtual NIC as “virtual_nic”
– Creating virtual connection as “virtual_connection” which uses “yasu” and “virtual_nic”
sudo /opt/vpnclient/vpncmd
(snip)
1. Management of VPN Server or VPN Bridge
2. Management of VPN Client
3. Use of VPN Tools (certificate creation and Network Traffic Speed Test Tool)

Select 1, 2 or 3: 2 (Enter)
(snip)
Hostname of IP Address of Destination: (Enter)
(snip)
VPN Client>NicCreate virtual_nic
(snip)
VPN Client>AccountCreate virtual_connection /SERVER:aa.bb.cc.dd:5555 /HUB:virtual_hub /USERNAME:yasu /NICNAME:virtual_nic
(snip)
VPN Client>NicEnable virtual_nic
(snip)
VPN Client>AccountPasswordSet virtual_connection /PASSWORD:*********** /TYPE:standard
I tried to connect VPN Server and succeeded!
VPN Client>AccountConnect virtual_connection
(snip)
VPN Client>AccountStatusGet
Item                                      |Value
------------------------------------------+--------------------------------------------------------
VPN Connection Setting Name               |virtual_connection
Session Status                            |Connection Completed (Session Established)
(snip)
I manually assigned static IP address to virtual_nic.
For some reason prefix “vpn_” will be automatically added.
sudo ip address add 192.168.100.50/24 dev vpn_virtual_nic

ip a show
3: vpn_virtual_nic: <BROADCAST,MULTICAST,UP,LOWER_UP> mtu 1500 qdisc pfifo_fast state UNKNOWN group default qlen 1000
    link/ether 5e:cd:4d:67:5e:06 brd ff:ff:ff:ff:ff:ff
    inet 192.168.100.50/24 scope global vpn_virtual_nic
       valid_lft forever preferred_lft forever
    inet6 fe80::5ccd:4dff:fe67:5e06/64 scope link
       valid_lft forever preferred_lft forever
I did the same steps for user “fumi” and confirmed “yasu” and “fumi” could communicate each other.
ping 192.168.100.100
PING 192.168.100.100 (192.168.100.100) 56(84) bytes of data.
64 bytes from 192.168.100.100: icmp_seq=1 ttl=64 time=63.5 ms
64 bytes from 192.168.100.100: icmp_seq=2 ttl=64 time=53.5 ms
64 bytes from 192.168.100.100: icmp_seq=3 ttl=64 time=68.8 ms
64 bytes from 192.168.100.100: icmp_seq=4 ttl=64 time=61.5 ms
^C
--- 192.168.100.100 ping statistics ---
4 packets transmitted, 4 received, 0% packet loss, time 3004ms
rtt min/avg/max/mdev = 53.550/61.883/68.866/5.509 ms
After that I configured below.
- LightSail provides the contents of yasufumi-yokoyama.gq
- Started reverse-proxy on LightSail and forwards to Raspberry Pi
How is response speed?
I did benchmark by “time curl <target>”.
| # | http://localhost | https://yasufumi-yokoyama.gq |
| 1 | 125ms | 564ms |
| 2 | 163ms | 522ms |
| 3 | 125ms | 688ms |
| 4 | 138ms | 380ms |
| 5 | 180ms | 455ms |
Here we can see the delay is 200ms-500ms.
I think this performance is enough because this is personal use!
Conclusion
How was it?
This structure removes the limitation of ISP that needs to provide static IP address option!


Comments