Raspberry Pi 4のapache2で動いているnextcloudをHTTPS化しました!

最近はHTTPSが当たり前になっているよね。
ChromeはHTTPだと警告を出すし。
自分のサーバーもHTTPSにしておかなくちゃ。
SNIや証明書の期限更新にも対応しておきたいな。
こんな要求を解決します。
HTTPSとは

ご存知の方も多いと思いますが、HTTPSはHTTPのSSL/TLS版です。
※SSLは脆弱性があるため事実上使用禁止

HTTPSなら知ってるよ!
HTTPを暗号化したものでしょ?
大体合っていますが、以下のメリットがあります。
・盗聴の防止
通信データを暗号化するため、中身を盗み見られることがない
・改ざんの防止
通信データを暗号化するため、中身を勝手に変更されることがない
正確には変更されたら変更されたことがわかるようになっている
・なりすましの防止
デジタル証明書を使うため、送信元サーバーの身元が保証される
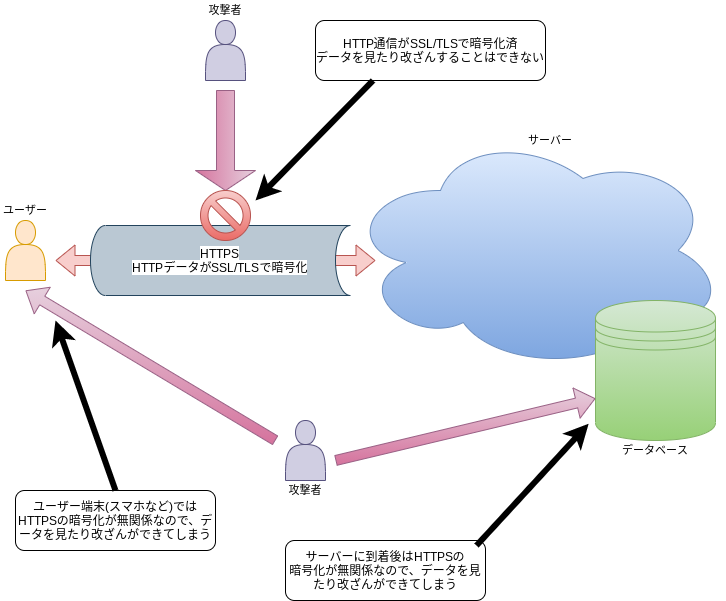
気を付けたいのは、通信時のデータのみが守られるということです。
そのため、データベースに入っているデータなど、サーバーそのものに対する攻撃や、スマホでのパスワード入力を盗み取られる、といった攻撃には無力であることを認識しておきましょう。

そのため、HTTPSをやったからと言ってセキュリティ対策が万全ということではありません。
ですが、やらないと更に脆弱なシステムになりますので、対応は必須です。
HTTPS化に必要な作業

以下の作業は必須です。
☑TLS証明書の取得、apache2への設定
以下は必須ではないですが、セキュリティ強化のため実施をオススメします。
👍SSL、TLS1.0/1.1の無効化
👍暗号スイートの選定
ドメイン名の取得と設定は既に終わっている前提で説明していきます。
まだ終わっていない方は↓の記事を参考に対応してみてください。
TLS証明書の取得、apache2への設定

HTTPSを実現するためにはデジタル証明書というものが必要です。
これをドメイン名と紐付けることで設定が完了します。
これをやるにあたり以下のサイトを参考にさせていただきました、感謝。

まずデジタル証明書を作るためのパッケージをインストールします。
sudo apt install certbot python-certbot-apache
証明書作成を始めましょう。
メールアドレスを求められるので、素直に入力します。
used for urgent renewal and security notices
とあるので、営利目的で使われることはなさそうです。
sudo certbot
Saving debug log to /var/log/letsencrypt/letsencrypt.log
Plugins selected: Authenticator apache, Installer apache
Enter email address (used for urgent renewal and security notices) (Enter 'c' to
cancel): abcde@hotmail.com
使用許諾に同意するか聞かれるので、ここは素直にAgreeしておきましょう。
- - - - - - - - - - - - - - - - - - - - - - - - - - - - - - - - - - - - - - - - Please read the Terms of Service atYou must agree in order to register with the ACME server at
Electronic Frontier Foundationという団体にメールアドレスをシェアしてもいいか?
と聞かれます。
Noを選んでも問題ありません。
- - - - - - - - - - - - - - - - - - - - - - - - - - - - - - - - - - - - - - - -
Would you be willing to share your email address with the Electronic Frontier
Foundation, a founding partner of the Let's Encrypt project and the non-profit
organization that develops Certbot? We'd like to send you email about our work
encrypting the web, EFF news, campaigns, and ways to support digital freedom.
- - - - - - - - - - - - - - - - - - - - - - - - - - - - - - - - - - - - - - - -
(Y)es/(N)o: N
証明書を作るドメイン名を聞かれます。
通常は1と入力してEnterするだけで良いはず。
Which names would you like to activate HTTPS for?
- - - - - - - - - - - - - - - - - - - - - - - - - - - - - - - - - - - - - - - -
1: yasufumi-yokoyama.gq
- - - - - - - - - - - - - - - - - - - - - - - - - - - - - - - - - - - - - - - -
Select the appropriate numbers separated by commas and/or spaces, or leave input
blank to select all options shown (Enter 'c' to cancel): 1
http://yasufumi-yokoyama.gqへの要求をhttps://yasufumi-yokoyama.gqにリダイレクトするか?
と聞かれます。
これはやる方がセキュリティが高まるので2を選んでやっておきましょう。
Please choose whether or not to redirect HTTP traffic to HTTPS, removing HTTP access.
- - - - - - - - - - - - - - - - - - - - - - - - - - - - - - - - - - - - - - - -
1: No redirect - Make no further changes to the webserver configuration.
2: Redirect - Make all requests redirect to secure HTTPS access. Choose this for
new sites, or if you're confident your site works on HTTPS. You can undo this
change by editing your web server's configuration.
- - - - - - - - - - - - - - - - - - - - - - - - - - - - - - - - - - - - - - - -
Select the appropriate number [1-2] then [enter] (press 'c' to cancel): 2
うまくいくと、
Congratulations! You have successfully enabled https://yasufumi-yokoyama.gq
みたいな表示が出てコマンド完了します。
お次はhttps://www.yasufumi-yokoyama.gqに対応させます。
以下のコマンドを実行しましょう。
sudo certbot certonly --webroot -w /var/www/html -d yasufumi-yokoyama.gq -d www.yasufumi-yokoyama.gq
「もともとhttps://yasufumi-yokoyama.gqの証明書があるよ」
「https://www.yasufumi-yokoyama.gqにも対応させたいんだね?」
「じゃあこれからやるよ、いい?」
と聞かれるので、Expandを選びます。
- - - - - - - - - - - - - - - - - - - - - - - - - - - - - - - - - - - - - - - -
You have an existing certificate that contains a portion of the domains you
requested (ref: /etc/letsencrypt/renewal/yasufumi-yokoyama.gq.conf)

It contains these names: yasufumi-yokoyama.gq

You requested these names for the new certificate: yasufumi-yokoyama.gq,
www.yasufumi-yokoyama.gq.

Do you want to expand and replace this existing certificate with the new
certificate?
- - - - - - - - - - - - - - - - - - - - - - - - - - - - - - - - - - - - - - - -
(E)xpand/(C)ancel: E
apache2でHTTPSを有効化し、再起動します。
sudo a2ensite default-ssl
sudo systemctl restart apache2
ここまでくれば
https://yasufumi-yokoyama.gq
https://www.yasufumi-yokoyama.gq
両方のURLでアクセスできるようになっていると思います。
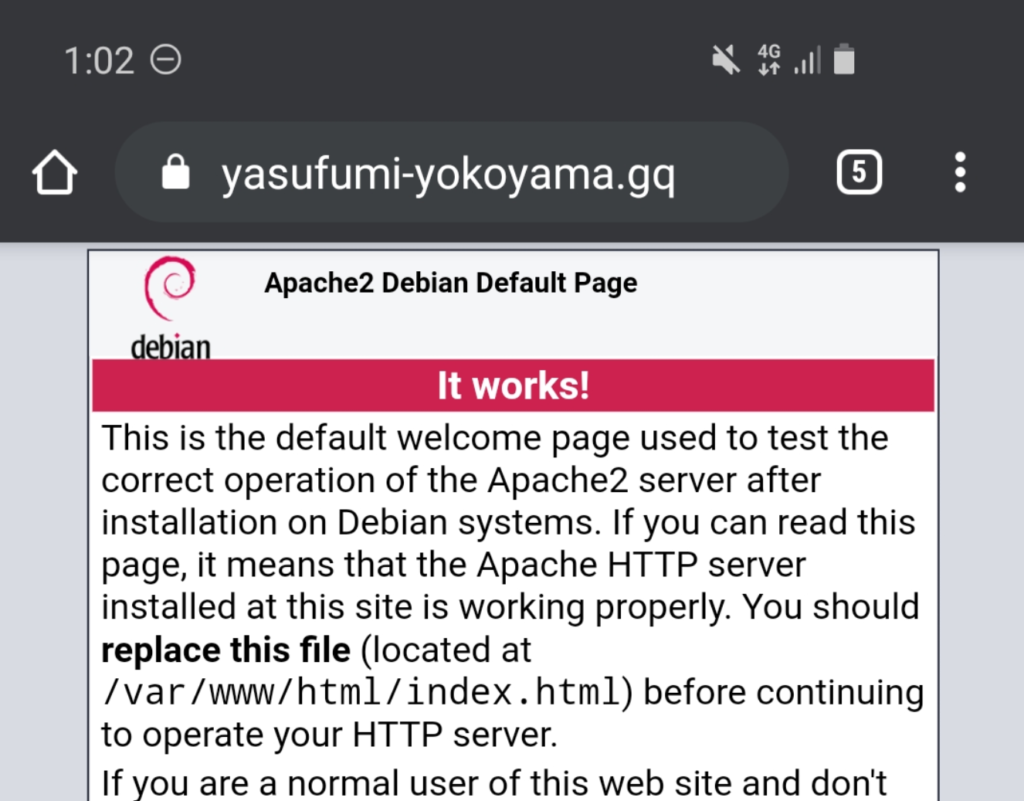
先ほどと同じくWi-FiをOFFにしたスマホからアクセスしてみましょう。
URLの左側に南京錠マーク🔒があり、HTTPS化できているのがわかりますね!

証明書の更新

取得した証明書は期限が3ヶ月しかなく、3ヶ月が経過するとChromeやFirefoxから信頼できないサイト扱いされてしまいます。
これを避けるために、3ヶ月経過する前に証明書を更新する必要があります。
これをやるのは簡単です。
sudo certbot renewをやれば証明書を更新できます!
ご自身で定期的に実行するか、cronにでも入れておきましょう。
SSL、TLS1.0/1.1の無効化、暗号スイートの選定

ここまででHTTPS化は終わりました。
ですが、HTTPSも完璧ではありません。
古いプロトコルや暗号スイートでは既知の脆弱性があり、破られてしまいます。
昔、HeartbeatやPoodleとかいうのがありましたね…
これを避けるために、強度を高くしておきましょう。
このサイトを参考にしました。
sudo vim /etc/letsencrypt/options-ssl-apache.conf

# 以下options-ssl-apache.confの内容
# 強度の高い暗号スイートに限定する
# SSLCipherSuite HIGH:!aNULL
SSLCipherSuite ECDHE-ECDSA-AES256-GCM-SHA384:ECDHE-RSA-AES256-GCM-SHA384:ECDHE-ECDSA-CHACHA20-POLY1305:ECDHE-RSA-CHACHA20-POLY1305:ECDHE-ECDSA-AES128-GCM-SHA256:ECDHE-RSA-AES128-GCM-SHA256:ECDHE-ECDSA-AES256-SHA384:ECDHE-ECDSA-AES128-SHA256

# TLS1.0とTLS1.1も無効化する
# SSLProtocol all -SSLv3
SSLProtocol all -SSLv3 -TLSv1 -TLSv1.1

# apache2再起動
sudo systemctl restart apache2
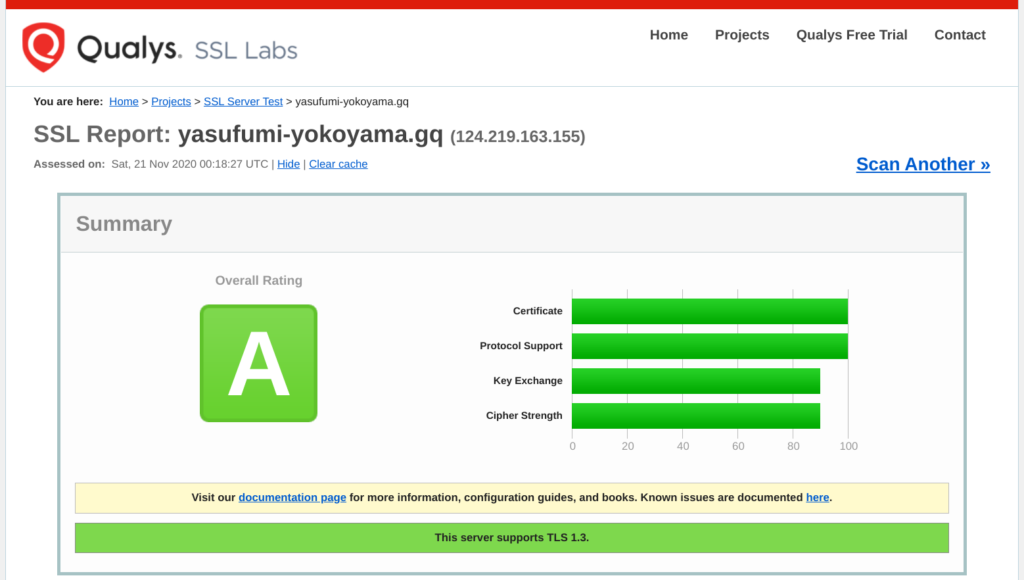
↓のURLでセキュリティ強度を計測できます。
https://www.ssllabs.com/ssltest/analyze.html?d=yasufumi-yokoyama.gq
やってみましょう。
A判定ということでまずは一安心な状態になりました。

終わりに
いかがでしたか。
セキュリティ対策は攻撃者とのいたちごっこであり、
これをやったからと言って完璧!
ではなく、常に最新の情報を取得して脆弱性が見つかればすぐに手を打つ必要があります。
その意味ではここがスタートラインです。
やるべきセキュリティ対策はまだあります。
もしご自身で試されているなかでお困りのことなどありましたら、お問合せフォームやSNSでお気軽にメッセージ下さい!
↓のページには、Raspberry Pi 4をnextcloudサーバーとしてクラウドストレージとして動かすまでを各ステップ順を追って説明しています!
こちらも合わせてどうぞ!


Comments